Stash & Spending

Monday, December 14, 2015

Black & White Lace

Now that Dancing with the Stars is over, I find I have a lot more time on Mondays.  It's odd.

But with my free time, I get to paint my nails (and blog about them, of course!), play with makeup, and play video games!  That's the life of the typical millenial, aka me.

For my nails now, I've had the idea in my head for about a week, but it was in bits and pieces and not a complete thought.  I'm so glad I got it all out on my nails though.


For this manicure:
  • Base Coat - Bonder by ORLY
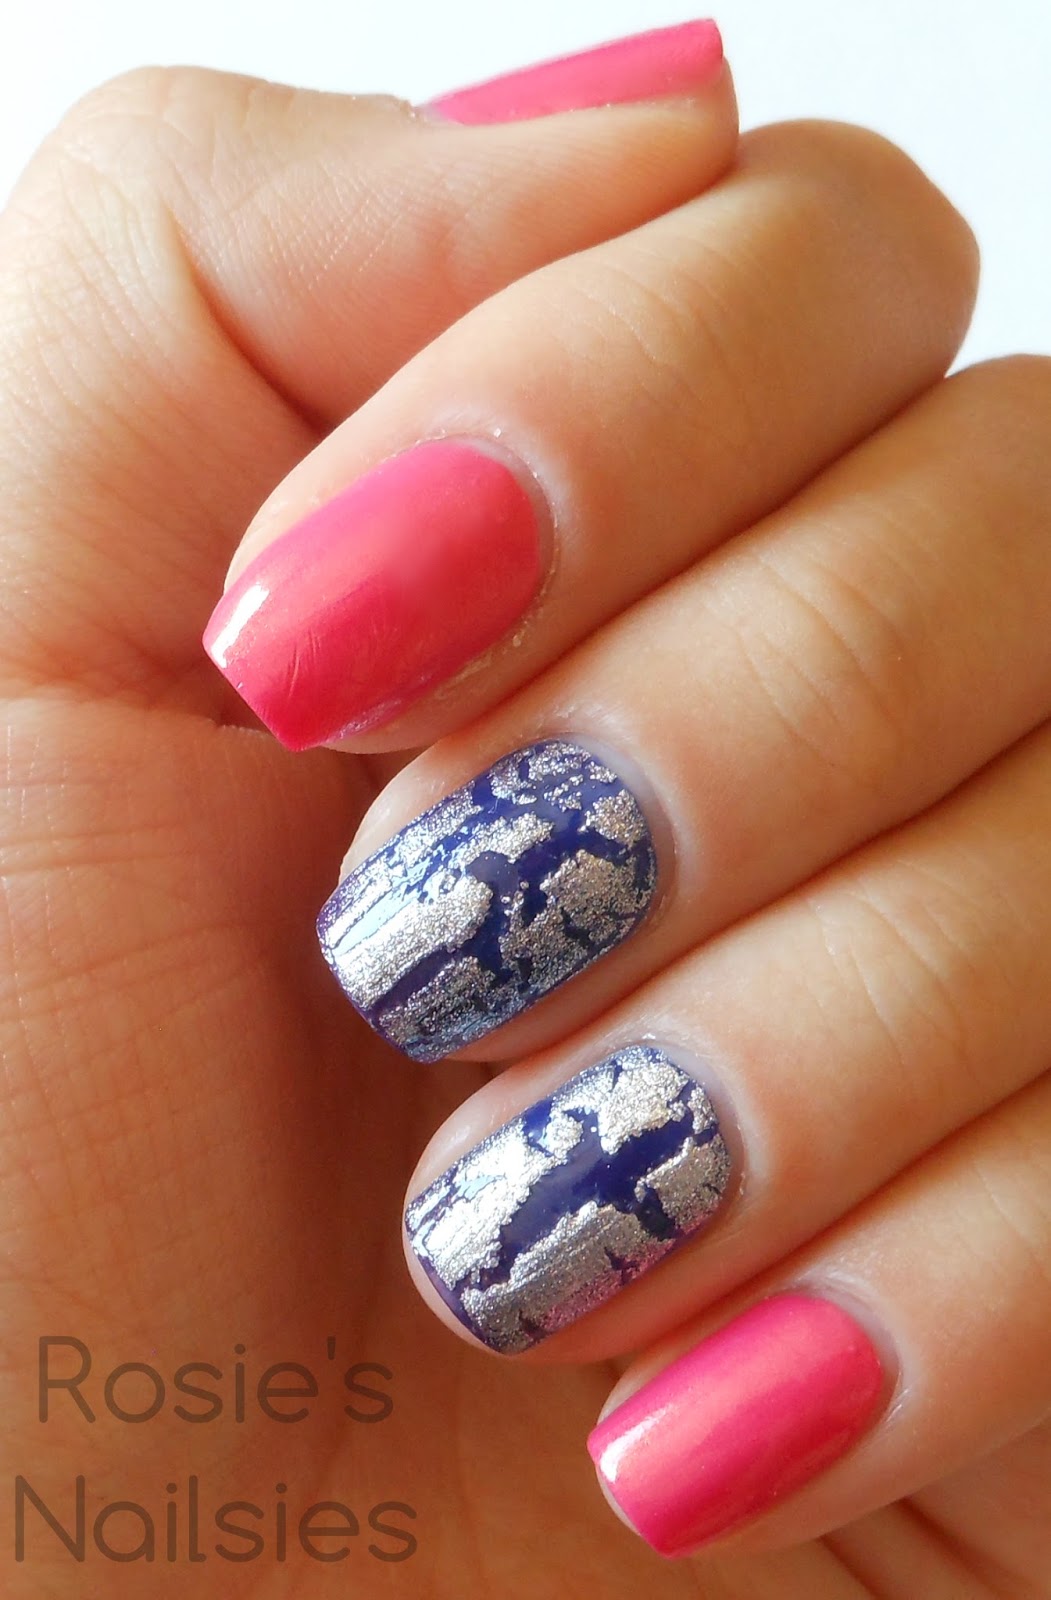
  • Base Colors - unnamed magenta shimmer & unnamed pale fuchsia shimmer by Shades of the Season
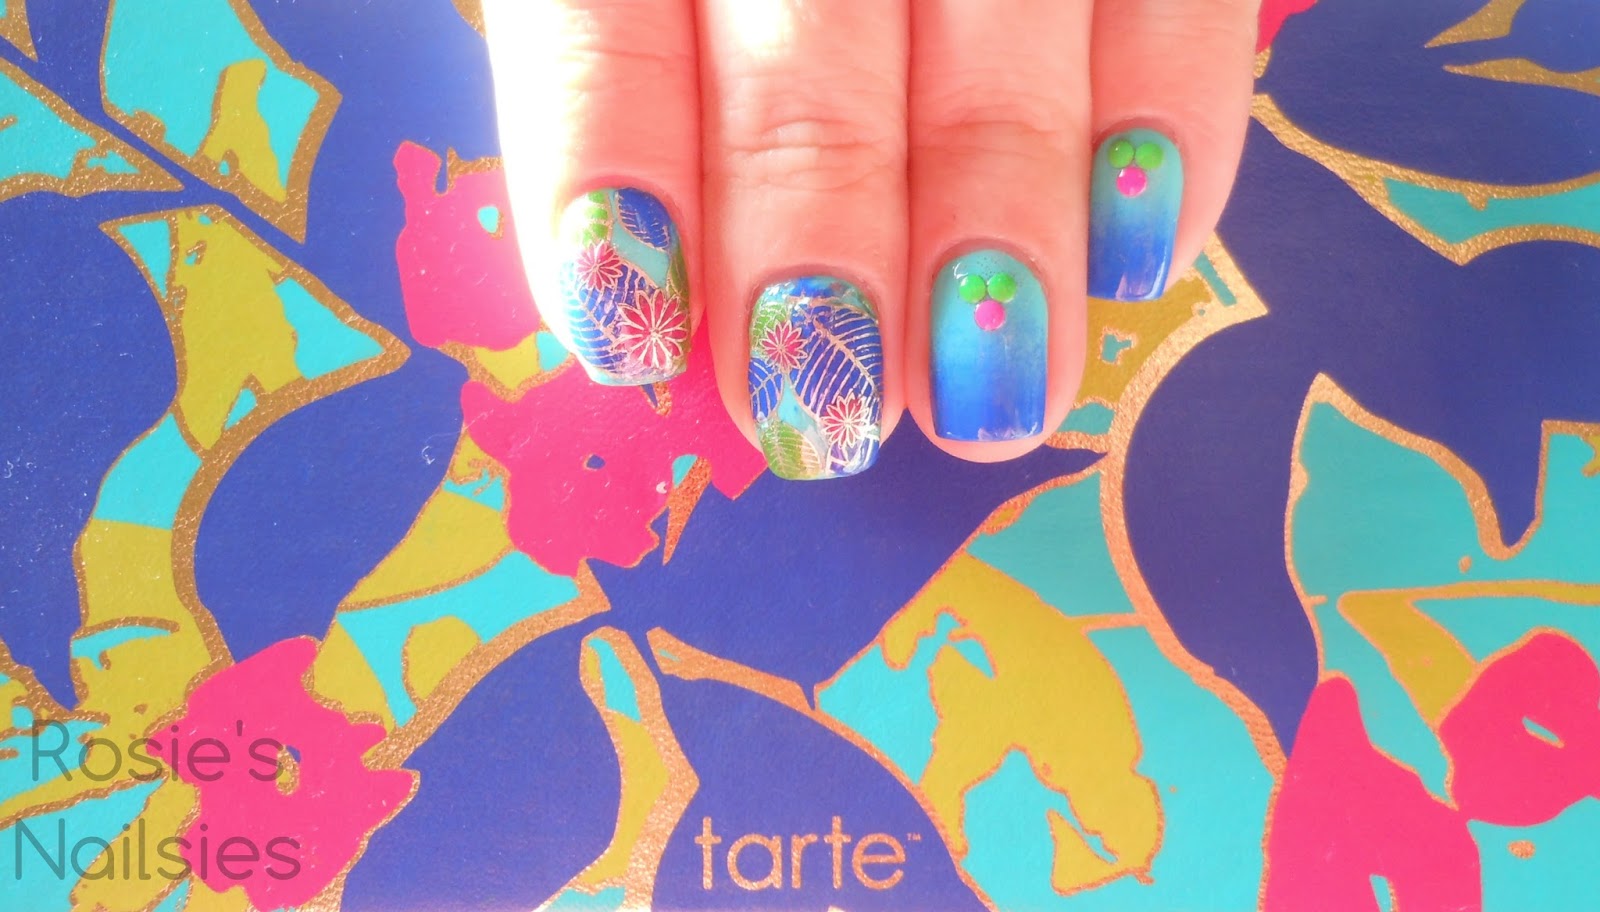
  • Stamping - used special white polish by Konad & noir black by b.m.c. using stamp plate BM-021 by Bundle Monster
  • Top Coat - Out the Door by inm
Approximate Completion Time: 2 hours


The stamping was harder than I expected because the stamp image I chose had a large fill space for polish, and I wasn't used to how much polish I had to use and how precisely I had to pick up the image (or else it would smear).

But these are all good experiences to have!


It's getting closer to Christmas and New Year's...so my next few nails will be outrageously festive.  I realize these nails are a little bit too delicate for the storm that is the holidays that will soon be upon us.

This is all I have for now.  Stay warm out there friends, and I'll see you next time! :)


Tuesday, December 8, 2015

Blue French Tip

Hello all!  I know I haven't posted in a while, but I actually did paint my nails at least once before this post but I didn't have the time to blog about it because it was Thanksgiving and I was busy eating/shopping/being lazy...ah yes, the American dream.

Anyways, here are my nails for now :)


For this manicure:
  • Base Coat - Bonder by ORLY
  • Base Color - mademoiselle by essie
  • Tip Colors - Jeanne by Julep & Tribeca Silver by NYC; blue part was freehanded, and silver part was painted on using a nail art striper brush
  • Stamp - BM-020 stamp plate by Bundle Monster used with special white polish by Konad
  • Top Coat - Out the Door by inm
Approximate Completion Time: 1.5 hours


French manicures are actually easier for me to paint on other than on myself.  When I paint my own nails, I often get caught up in the design and forget to take that step back so as to make sure my nails are even.  But when I paint on others I can easily step back and assess my progress.

I got to test out my new UberChic mat for nail art and large sticky stampers for this design.  The mat is amazing (so innovative yet so simple!) and the sticky stamper is too much fun.  I maybe spent a good 5 minutes just touching the stamping head and marveling at how sticky it was.  It's like touching jello.


I got home an hour early today so now I'm really confused as to what to do with my extra hour of free time...I honestly might just spend it playing Splatoon.

Well that's all I have to say for today.  Please stay safe, and I'll be back in about a week, plus or minus a few days.

Yeah :D

Monday, November 16, 2015

Tricolor Braid

Hello all!  I hope you are all doing well :)

It's not the catchiest title, but it captures the essence of what I painted on my nails.

I got my flu shot today, so my left arm is going to be sore tomorrow ;_; however, my left arm is the arm I use the least in my lab work so I think I'll be good to go tomorrow.

But also the meteorologist predicts blizzard-like conditions so it's possible that I get a snow day tomorrow.  A snow day!  I haven't had one of those in like 8 years now.

Regardless of my sore arm and the cold weather, here are my nails:


For this manicure:
  • Base Coat - Bonder by ORLY
  • Thumb & Pinky - Julep by Julep
  • Pointer & Middle - My Vampire is Buff by OPI as the base color; braid segments separated out using striping tape and filled in using a striping brush and Hocus Pocus by Formula X, Lainey by Julep, Mia by Julep
  • Ring - Ellis by Julep
  • Top Coat - Out the Door by inm
Approximate Completion Time: 2 hours


The color on my ring finger is my first holographic polish!  I'm finally joining the craze - slowly but surely.  Julep calls it a "liquid holographic" polish.  I'm not sure if liquid is really the right word for this color, but it is very addicting to look at in real life.  If I didn't have to wear gloves at work I'm pretty sure I would be focusing all my time and attention on this one polish, rather than on the blood samples that need to be tested for antibodies linked to diabetes...


I actually painted my nails over the course of 2 days.  The first day, I just put down all the base color on my nails and after my nails dried, I went to bed.  Then the second day, I finished the design with the braid pattern.  I would have done this all in one day but for some reason I thought that splitting the design creation would be easier.  I was right.


Look at those crisp, clean lines.

With this colder weather, I wonder how my cuticles and skin will change.  I haven't steadily lived in Colorado for over 4 years now, so I have no idea how my skin is going to deal with the transition from fall to dead winter.  Goodness.

I hope you are all warmer than I am.  That's all I have to say for now, and I hope you all have a wonderful day!

Talk to you soon :)

Monday, November 9, 2015

Ice & Snow

Hello all!  As I write this, I am being informed that there is quite a scary winter storm approaching.  By "scary", I really mean "blizzard-like conditions" and I'm actually honestly not sure whether going to work is gonna be worth it.

So my nails reflect the ice and snow that will soon be all over this freaking place.  Give me my fuzzy socks, my warm gloves, and hot chocolate pronto.


For this manicure:
  • Base Coat - Bonder by ORLY
  • Thumb, Ring, & Pinky - What a Broad by Sephora by OPI; ice imitated via silver foil purchased from rue21
  • Ponter & Middle - Endless Blue by Sinful Colors; stamped with iced silver by b.m.c. using SH202 plate by Shany Cosmetics
  • Top Coat - Out the Door by inm
Approximate Completion Time: 1.5 hours


What happened was as I was taking more pictures, my camera decided to run out of battery :o then I charged my camera, and I was charging said camera, my nails got scratched and chipped.

But still, even having 2 good pictures beats having no pictures to show.

It's cold enough to start wearing socks to sleep o.o hopefully the cold doesn't get to the best of me.

That's all for me for today.  I hope you all stay warm wherever you are!! :)

Monday, November 2, 2015

Pusheen the Cat Nails

Hello all!  Today I have Pusheen nails to show you :)

Pusheen the Cat is the cute, cartoon cat whose adventures and other silliness have been captured by Claire Belton.  Please visit http://www.pusheen.com/ on a daily basis as a way to bring a smile to your face daily! :)

But actually the reason why I painted Pusheen the Cat on my nails is because a friend of mine had requested them, and I was like "yeah why not".  This conversation happened back in the earlier parts of summer.  It's now November.  But let it be said that I am a keeper of my word, no matter how long it takes for my words and promises to be kept.

If you don't love Pusheen the Cat, you're wrong.  Fact.


For this manicure:
  • Base Coat - Bonder by ORLY
  • Thumb & Pinky - Erin by Julep; stamped with Special White Polish by Konad & iced silver by Bundle Monster using the stamping plate BM-019 BY Bundle Monster
  • Pointer - Frankly, I Don't Give A-dam by Sephora by OPI; Pusheen the Cat face details done with a thin striping brush and Janae by Julep
  • Middle & Ring - Mint Sorbet by Sally Hansen Xtreme Wear; nail decals made using Double Duty Base & Top Coat by Sally Hansen, Penelope & Janae by Julep, & I Gotta Blush on You & Frankly, I Don't Give A-dam by Sephora by OPI; nail decals stuck on using Out the Door by inm
  • Top Coat - Out the Door by inm
Approximate Completion Time: 1.5 hours


I confess that I did quite a bit of photo editing for these pictures.  The reason is because I messed up and trapped a lot of air bubbles underneath the nail decals :( so I decided to smooth over those air bubbles the best I could while editing.

And somehow that triggered minor strains of trypophobia in me.  I'm normally not reactive to trypophobia but seeing holes in my nail polish made me feel a little bit uneasy.  Anyways, for those of you with that condition, I saved y'all from an attack.  And please don't Google image search trypophobia because good Lord you will not sleep well tonight.


I've also started using liquid latex barriers around my nails every time I paint them.  It really helps with the clean up (yay reduced clean up).  On the one hand, the nail art community can very easily go back to our old clean up routines, but on the other hand, acetone is a harsh cleaning agent so do we really want to expose our biological systems to that?  No.

I've read the MSD form for acetone too many times now.

That's all from me for now.  I hope you all have a wonderful week, and I'll be posting again soon!  But until then, stay safe, eat good food, play video games, etc.

You do you.


Saturday, October 24, 2015

Triforce Heroes Nail Art

Hello all!  If you've been following Nintendo at all lately, you would know that they just released a new game for the Nintendo 3DS.  I played a demo of said game.  Triforce Heroes is so cute :) it has the art style of Link Between Worlds, and the online multiplayer co-op is truly a test of patience, skill, and achievement through limited communication.  If you have the 3DS, I would recommend you buy the game!

I too shall buy the game...after I finish Majora's Mask...uh...

But this isn't a post to review video games.  This is a post to show off the nail art that I made to celebrate the launch of the game! :D


For this manicure:
  • Base Coat - Bonder by ORLY
  • Base Color - Alexis by Julep
  • Triforce Colors - good as gold by essie, Nadia by Julep, Ruby Ruby by Sinful Colors, Endless Blue by Sinful Colors, Happy Ending by Sinful Colors; decals made with Double Duty Base & Top Coat by Sally Hansen
  • Top Coat - Out the Door by inm
Approximate Completion Time: 1.5 hours


I like how that picture makes the blue pop.  I was also really surprised that my camera was able to capture the purple.  Granted, I'm in direct sunlight, but cameras are notorious for losing the ability to can when it comes to the color purple.


I think I increased the saturation on my camera just by a little bit for this picture.  Maybe.  I forget.  But I'm really happy with this manicure :) for once, nail decals started to make sense to me and they didn't stick out so much in the photos, if even at all.  I used about 3 layers of top coat for the nails that had the decals, so I think the extra layers did the trick.


Hopefully I finish Majora's Mask soon so I can buy and play Triforce Heroes!  The reason why I haven't bought the game yet is because if I did, I know I would completely ignore Majora's Mask and only play Triforce Heroes, and it's a travesty because I'm so close to beating the game.

But why does Majora's Mask have to be so scary and stressful ;_;

Anyways, that's all for now.  I hope I'll be able to post another set of nails soon! :) But until then, I hope you have a wonderful day!


Monday, October 19, 2015

Time to Get Spoopy!

I'm actually not that into Halloween nail art.  Lately, I've been seeing a lot of artists on Instagram recreate looks that are very scary and spooky.

Why do y'all taunt the dead now ._.

So here are my nails that I wore to show that I have some Halloween spirit in me.  Like the innocent Halloween spirit.  Like the Halloween spirit of the older sister who dresses up as Queen Elsa and forces the younger sister to be Princess Anna even though the younger sister probably wants to be Queen Elsa but she's just gotta let it go.  That type of innocent Halloween spirit.


For this manicure:
  • Base Coat - Bonder by ORLY
  • Base Color - Surreal by Formula X
  • Middle & Pointer - applied a coat of Out the Door by inm to help speed up drying time, then stamped Bunny by Julep over Honeycomb Stencils by vinyl boutique
  • Top Coat - Blast Off by Formula X, then Matte Me Crazy by NYC
Approximate Completion Time: 2 hours


As you can see, I'm experimenting with different poses.  It seems like I'm not satisfied with my work lately, so hopefully I can find solace with my photos now.

Here is a close up shot of the stencil pattern on my nail, just in case you wanted to see how amazing and intricate and clean nail vinyls can be!


BOOM.  HONEYCOMBS.  FOR THE BEES.  THEY MAKE THE HONEY.

Also, I've been featured several times in Natalia Tera's blog.  Her blog is a form of nail art, but not what you would expect.  Rather than painting her own nails and showcasing such, she requests nail artists to send in photos of their bare nails and their bare nails + base/top coat.  It's an art form all of its own.  Here is a link to her blog:

http://nataliateranails.blogspot.com/

Please go check out her blog!  And extra kudos to you if you find my nails :)

And lastly, it seems there is enough interest for me to start an actual Facebook page for my blog (shocking, I know...), and I will get on it.  Just not right now.  My personal life is a little bit crazy at the moment, but right now my plan is to have the page up and running by January 1, 2016!!  So please stay tuned for more :)

That's all for now!  I hope you all have a wonderful day :D


Sunday, October 4, 2015

Carousel Ball Nails

Please understand that I volunteered for charity because I'm a good person.  We raised a lot of money for diabetes research and treatment options (and by "a lot of money" I mean like enough to pay for all 4 years of USC).  It was a wonderful night.  So many rich people.

Also I got to see Usher and John Elway, so that was pretty cool.

And since I work in both diabetes research and got to go to a free concert all for charity, I think I'm the real winner here tbh

Anyways, since I knew I was gonna be surrounded by so much wealth, I decided to paint my nails to reflect how simple yet sophisticated I was.  Or something along those lines.

Too bad nobody commented on my manicure ;_;


For this manicure:
  • Base Coat - Bonder by ORLY
  • Thumb, Pointer, & MIddle - gradient made with makeup sponge and Myrtle by Julep, Mary Lee by Julep, & Black Out by Sally Hansen Xtreme Wear; stamped with BM-017 stamp plate by Bundle Monster using good as gold by essie
  • Ring & Pinky - Golden-I by Sally Hansen Xtreme Wear
  • Top Coat - Out the Door by inm
Approximate Completion Time: 1 hour


Also I bought a Nintendo WiiU, which came with Super Mario Maker and the 30th anniversary Mario amiibo and oh my God bless freaking Nintendo ;u;

NOW WE JUST NEED ZELDA WIIU OKAY I CAN ALREADY SEE MYSELF CRYING TO THE MUSIC which is also how I feel every time I listen to Kingdom Hearts music.  Some may say I cry too easily.  I say...neh.


Tuesday, September 29, 2015

Alopecia Awareness Nails

Once upon a time, there was a younger me who was going through the typical angst that is puberty and I seriously was mad at God for making it so that I had alopecia.  I was like 100% sure He had a hand in it (maybe He does, maybe He doesn't).  I so wished that this condition was embodied within someone else and not in me.

But God works in interesting ways to bless His people.  I don't wake up thanking Him for my alopecia, but I do finally appreciate how it has shifted the way I perceive my own body image.  My church also prayed for me over the course of 5 years.  I remember that final doctor's visit where the doctor told me that I didn't need to continue using whatever solution I was using at that time, because my hair has grown back at an immensely faster rate than he had expected.

Throughout college, there were times when God seemed so far away, but I would have to remind myself that I was living proof of His miracle.  My hair is proof of His miracle.  Of course, college stress meant that I would have occasional flare ups and lose hair time and time again, but that hair always grew back.  My hair isn't dense and thick.  It's pretty thin, but yo I'm thankful.  However, I have like 1.2 eyebrows.

Of course, those antibodies still exist in my blood (as far as I'm concerned...haven't been tested since), which means I technically still have alopecia.  It would be cool if we could cure alopecia, but since it's an autoimmune disease, that would be quite the challenge.  How does one selectively target antibodies??  Granted, I wouldn't need such a cure because I feel pretty confident in my condition, but for those people out there who do have alopecia and do want a cure...that would be nice for them.

Anyways, September is Alopecia Awareness Month, with the awareness being the color blue for some reason.  So here is my contribution to the awareness:


For this manicure:
  • Base Coat - Double Duty Strengthening Base & Top Coat by Sally Hansen
  • Thumb, Ring, & Pinky - aruba blue by essie; glitter gradient made using a makeup sponge and Portia by Julep
  • Pointer & Middle - Shelly by Julep; used Fishnet Stencil from Vinyl Boutique and stamped gradient over it using Jeanne by Julep, Endless Blue by Sinful Colors, & Char by Julep
  • Top Coat - Out the Door by inm
Approximate Completion Time: 2 hours


Surprise, surprise - the top coat dries quickly, which makes the vinyls easier to use.  Nail vinyls are pretty legit.  I remember seeing them for the first time a few years ago and I was like "this is a cool concept but it's never gonna catch on".  I was wrong.  This is also how I felt about Vine, Snapchat, the Nintendo WiiU, etc.

Clearly I have been wrong on more than one occasion.  I can own up to that.


Sunday, September 20, 2015

Inspired by: "Golden Days & Sultry Nights" Eyeshadow Palette by Tarte Cosmetics

There are a lot of words in that title, but it gets the message across.

I bought this palette from Sephora because there was a summer sale AND I had just gotten my first paycheck!  That was a highly dangerous combination, but it's okay because nobody got hurt :)

The more I stare at the colors (& at the name) of this eyeshadow palette, the more I feel inspired to be artistic and creative.  And I imagine myself vacationing by the beach in Hawai'i with a drink in hand :)

But for now, I am landlocked and working full time, so my vacation days can wait!


For this manicure:
  • Base Coat - Bonder by ORLY
  • Base Color - Too Yacht to Handle by China Glaze
  • Thumb, Ring, & Pinky - sponged gradient with Too Yacht to Handle by China Glaze & Endless Blue by Sinful Colors, neon circle studs from BornPrettyStore
  • Pointer & Middle - reverse stamped with image plates BM-023 & BM-012 from Bundle Monster using good as gold by essie, image filled in with Endless Blue & Happy Ending by Sinful Colors & Shocking by Marc Jacobs
  • Top Coat - Out the Door by inm
Approximate Completion Time: 1.5 hours


Technically it took me longer than that if you include the amount of time I spent prepping with the reverse stamping.  But even then, that's a lot of drying time, so I thought it would be best if that was left out.

I'm very happy with this mani.  I haven't been this satisfied with my own work for a while now, so to have this feeling back makes me feel very complete :)

This is one of those nail art designs that I don't want to take off, but I will in a few days...such is the life of a nail artist.


UGH.  THE COLORS.  THE DESIGN.  THE INSPIRATION.  THIS WAS ALL SO PERFECT.


Monday, September 7, 2015

Beat Arkansas State!

And beat them we did :D

Since I wasn't able to watch the game live (it was airing on the Pac-12 network and we don't got money for freaking cable like come on college football let's remember those of us in the lower middle class who don't have access to all the nice things in the world -____-), I will be spending my day today catching up with the game.

But at least my nails were on point.  I hear there were fireworks at the game as well :O


For this manicure:
  • Base Coat - Bonder by ORLY
  • Base Color - Myrtle by Julep
  • Stamp & Dot Color - good as gold by essie (dots made using a dotting tool)
  • Stamp Plate - BM-005 by Bundle Monster
  • Top Coat - Out the Door by inm
Approximate Completion Time: 1 hour


I just ordered some nail vinyls and they're on their way over to my house.  I'm not sure when I will get them, but I'm excited because I've seen them all over my Instagram and have yet to try them.  But now I will just be patient and wait :)

That's all I have to report on today.  Have a wonderful day! :)


Saturday, August 29, 2015

Arches

So I've been away for a really long time, and now that I have a full-time job, my free time is really limited.  I'm basically gone for 12 hours a day on Mondays - Fridays (yay long commutes), and when I get home, I'm very exhausted.  However, I do have other interests outside of nail art, so I must be very intentional with how I spend my free time.

Sometimes I play video games.  Sometimes I color.  Recently though, my priority has been shifted to making birthday cards for friends.  And when I have the time and the inspiration, I paint my nails.

Sorry in advance if this blog is not as active as you would have hoped.

Here is my most recent manicure:


For this manicure:
  • Base Coat - Bonder by ORLY
  • Base Colors - In the Lime Light by China Glaze, Shrimply Devine by Sally Hansen Complete Salon Manicure, aruba blue by essie, & Tribeca Silver by NYC
  • Top Coats - Out the Door by inm & Matte Me Crazy by NYC
  • Tools used - striping tape
Approximate Completion Time: 2 hours


I've been watching a lot of nail artists work their magic on instagram.  The general trend for multi-layer designs is to seal the bottom layers with a fast drying top coat first, and then continue onto the rest of the design.  It's such a simple yet genius concept!  I wish I really had considered that sooner.  It would have made my other nail art less time-consuming, or even allowed me more time to make more intricate designs!

The world of nail art is fast evolving, and I'm really enjoying seeing all these different designs and techniques surface :)

I am currently thinking up new designs, so hopefully I get around to painting my nails again soon!  Additionally, I have a shipment of polish coming from Julep and another one from Sephora which should arrive soon...very excited for nail mail :D

That's all for now.  Have a wonderful day, my friends! :)


Sunday, July 26, 2015

Wedding Nails

My Bible study leader from my Freshman year of college got married this past weekend, so I had the honor of witnessing the confirmation of their love in holy matrimony :) it was the first time I've attended a friend's wedding.  Thankfully it was super casual, so I get to slowly practice appropriate wedding etiquette.  My knowledge and understanding of wedding etiquette will come in handy for the next 10 years as my friends get engaged and married!

But friends, if you're reading this, please pace out your weddings so I can attend all of them and not skimp out on wedding presents :D

My dress was a nice mint color, so I wore these nails to help encourage the summer spirit:


For this manicure:
  • Base Coat - Bonder by ORLY
  • Thumb, Ring, & Pinky - coral polish by bonita, Saaya by Julep, & Laree by Julep; stamped with royal blue by b.m.c using BM-023 plate by Bundle Monster; gradient made using make-up sponge
  • Pointer & Middle - coral polish by bonita, Saaya by Julep, & Laree by Julep; gradient made using make-up sponge
  • Top Coat - Out the Door by inm
Approximate Completion Time: 2 hours


To be perfectly honest, I was internally freaking out about how fancy I wanted my nails to be.  I can't have nicer nails than the bride...can I?  I don't think she ever saw my nails, so I think I was able to get away with this set of nails this one time.  Actually this is the one thing I still need to figure out, and I'm sure it varies by bride.

SO LADIES.  IF YOU'RE GETTING MARRIED AND I'M A GUEST, PLEASE LET ME KNOW HOW TONED DOWN MY NAILS ARE SUPPOSED TO BE BECAUSE I CLEARLY DON'T KNOW.

Alright, that's enough from me for today.  Have a wonderful day, and I hope I will be able to post again soon! :)


Monday, July 13, 2015

Interrupted Stardust

Hello!  After much running around and trying to get my life sorted out, I am back in sunny Los Angeles (and I got a sunburn basically as soon as I came back ;_; why).  My life still isn't sorted out, but that's okay because I at least got to paint my nails!

Everything is better with a set of new nails:


For this manicure:
  • Base Coat - Base Coat by Finger Paints
  • Thumb & Pinky - Lainey by Julep, neon blue stud from BornPrettyStore
  • Pointer & Ring - Lainey by Julep & Corinne by Julep; stripes made using striping tape
  • Middle - Corinne by Julep
  • Top Coat - Top Coat by Out the Door
Approximate Completion Time: 2 hours


The beige/sand color is a textured polish which Julep has appropriately dubbed as a "Stardust Finish".  It's different from a sand finish because the polish is also sparkly...like stardust.  I mean technically sand is also sparkly.  I know because I've gone to the beach at least once before.

There's just something about this color combination...

Well my life still isn't 100% together, but I mean I'm only like 22 and I still have time.  So although I am internally freaking out, I am also taking the time to enjoy it each step of the way :) 

Okay that is all for now.  Thanks for reading this post and I hope you have a wonderful day! :)


Friday, July 3, 2015

Independence Day Nails

Hello all!  This is odd for me; I usually don't post this often.  But here I am, a Permanent Resident dwelling on this American soil.

Happy birthday, America.  It's been 239 years since your birth and you've come a long way.  Still got a long ways to go, but I'm sort of happy that some positive changes have been made so far.

Here are my Independence Day nails for this year :)


For this manicure:
  • Base Coat - Double Duty Base & Top Coat by Sally Hansen
  • Thumb, Ring, & Pinky - Bunny by Julep & Molly by Julep; stripes made using transparent tape
  • Pointer & Middle - Char by Julep & Bunny by Julep; dotted star made using a dotting tool
  • Top Coat - Double Duty Base & Top Coat by Sally Hansen
Approximate Completion Time: 1.5 hours


This deep blue polish is a perfect polish because the color is amazing AND it's opaque in one coat.  ONE COAT.  ONE COAT WONDER ALERT.

Anyways, have a festive 4th of July!  Remember to drink responsibly, drive sober, and anything you say can and will be used against you.


Thursday, July 2, 2015

Silver Shards on a Subtle Gradient

Hello!  If you follow me on Instagram, you know that recently I made the life-changing decision to change from my usual oval nail shape to my current square nail shape.  I'll be keeping my square nails for at least a year to see what it's like throughout the year.  Maybe even longer.

If you don't follow me on Instagram...why not?  You should :)

But without further ado, here is my first nail art design on my square nails!


For this manicure:
  • Base Coat - Double Duty Base & Top Coat by Sally Hansen
  • Thumb, Pointer, & Pinky - Laree by Julep
  • Middle & Ring - Char by Julep, Alexis by Julep, & Glenda by Julep; gradient made using a make-up sponge
  • Top Coat - Double Duty Base & Top Coat by Sally Hansen
Approximate Completion Time: 2 hours


Even I can't see the gradient that well in real life, unless if I'm intentionally looking for it.  Also, this is the first time I've used crackle/shatter nail polish.  I remember when they were first introduced and people went CRAZY over them (back in 2011??) and now here I am, 4 years later, finally jumping on the hype train.  But the hype train has already up and left.  There's only one person on the train and that's me.

Remember how I said that I still had older posts to upload?  Well if you happen to see me flaunting oval nails in any future posts (during the next year), just know that those are from my stash of old posts that I need to upload.  I am not switching from oval to square to oval to square.  I'm just late to this function.

Thank you for taking the time to read this.  I hope you all have a wonderful day! :D


Tuesday, June 16, 2015

Nintendo Nails / Legend of Zelda Nails

Hello all!  I hope you are all as hyped as I am for this year's E3!  :D  If you're not...don't worry about it.  Just video game things being presented.  If that's not your cup of tea...well, if that's not your cup of tea, how the heck do you de-stress and fall into a new world?

Anyways, this past Sunday (14 June 2015), I was able to fill up my entire day with Nintendo-related events.  In the morning, I lined up at LA Live to get a Nintendo wristband for the Nintendo World Championships, which took place that afternoon.  During the evening, I attended the Legend of Zelda: Symphony of the Goddesses - Master Quest concert at the Walt Disney Concert Hall, also in Los Angeles.  It was a Sunday fun day Nintendo day for me!  On a side note - special wristbands were given to people who cosplayed, so that they were able to sit closer to the front and therefore have an increased likelihood of being on camera during the filming of the event.  I got a special wristband for wearing a Legend of Zelda themed shirt.  I really don't think that counts as cosplay, but I'm not complaining.  You can find me smiling and pointing at the camera for a few glorious seconds in the full-length recording of the Nintendo World Championships :)

My nails were dressed for the occasion.  On my left hand, we have my Nintendo-themed nails:


For this manicure:
  • Base Coat - Base Coat by Finger Paints
  • Colors - Bunny by Julep, Ruby Ruby by Sinful Colors
  • Tools - dotting tool
  • Top Coat - Top Coat by Out the Door
Approximate Completion Time:  1.5 hours


I often think about that one video of that kid getting a Nintendo 64 console on Christmas and freaking out about it.  I feel the same about Nintendo.

And then, on my right hand, we have my Legend of Zelda themed nails - specifically, Legend of Zelda: Ocarina of Time:


For this manicure:
  • Base Coat - Base Coat by Finger Paints
  • Base Color - Fiore by Julep
  • Thumb (Triforce) - Nadia by Julep, good as gold by essie; design made using a striper brush
  • Pointer (Kokiri Emerald) - Happy Ending by Sinful Colors, green glitter by Shades of the Season, good as gold by essie; design made using a dotting tool and a striper brush
  • Middle (Goron Ruby) - Ruby Ruby by Sinful Colors, red glitter by Shades of the Season, good as gold by essie; design made using a striper brush
  • Ring (Zora Sapphire) - Endless Blue by Sinful Colors, blue glitter by Shades of the Season, good as gold by essie; design made using a dotting tool and a striper brush
  • Pinky (Navi) - Char by Julep, Endless Blue by Sinful Colors, Jeanne by Julep, Shelly by Julep; design made using a dotting tool and a striper brush
  • Top Coat - Top Coat by Out the Door
Approximate Completion Time:  1.5 hours


You can tell that posing with my dominant hand and taking pictures with my non-dominant hand is definitely not my forte.  And especially since I had to do a weird pose to make all five of my digits visible!

The key for doing these nails is to make DIY nail art stickers!  :)  If there is any interest for a tutorial on how to do that, let me know.  I mean, alternatively, you can look it up on the internet, because literally that is what the internet is capable of - it is a world wide web full of information in every corner.

Thank you for taking the time to read this post.  I'm currently still in the process of getting life figured out (read that as "applying for jobs and trying to function as a normal adult"), so that takes up a huge portion of my time.  So sorry.  Actually just kidding I'm not sorry.  I need a job.  Student loans are not kind o.o

I hope you all have a wonderful day! :)